建立web应用
使用eclipse建立maven的web工程
配置web工程
完善目录
让目录变成标准的maven结构,增加Maven项目必要的主目录(src/main/java)和测试目录(src/test/java)。
参考 http://blog.rockcms.com/archives/159
配置tomcat maven
tomcat 添加用户
1
2
3
|
<role rolename="manager-gui"/>
<role rolename="admin-gui"/>
<user password="admin" roles="manager-gui,manager-script,admin-gui" username="admin"/>
|
maven settings.xml添加
1
2
3
4
5
|
<server>
    <id>tomcat7</id>
    <username>admin</username>
    <password>admin</password>
</server>
|
配置 Eclipse 项目
Preferences -> Maven -> Installations
不使用内置maven,使用我们自己安装的maven
项目 pom.xml
http://tomcat.apache.org/maven-plugin.html
 1
 2
 3
 4
 5
 6
 7
 8
 9
10
11
12
13
14
15
16
17
|
<build>
<finalName>SimpleDB</finalName>
<plugins>
  <plugin>
  <groupId>org.apache.tomcat.maven</groupId>
  <artifactId>tomcat7-maven-plugin</artifactId>
  <version>2.2</version>
  <configuration>
      <url>http://localhost:8080/manager/text</url>
      <server>tomcat7</server>
      <port>8080</port>
      <path>/simpledb</path>
      <charset>utf-8</charset>
  </configuration>
  </plugin>
	</plugins>
</build>
|
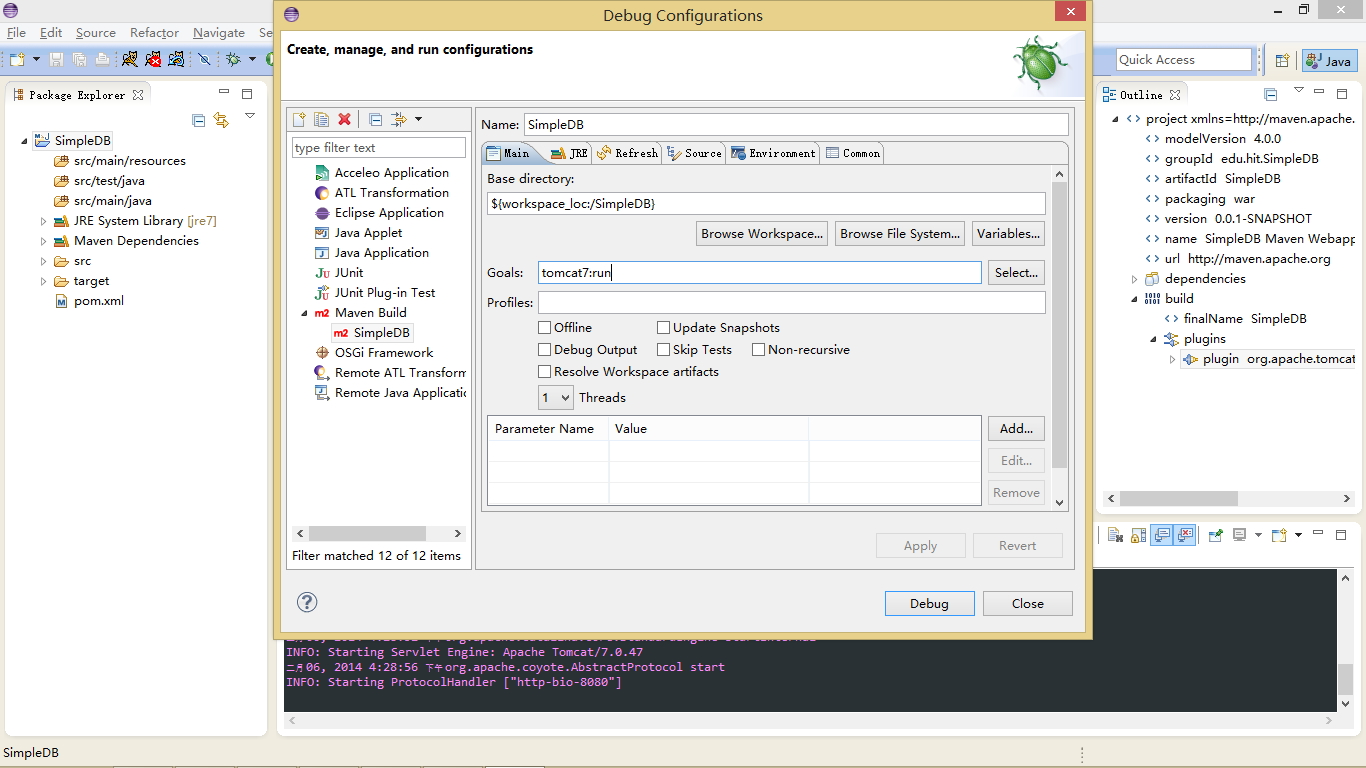
eclipse Debug Configuration
浏览器访问 http://127.0.0.1:8080/simpledb/
Servlet
pom.xml
 1
 2
 3
 4
 5
 6
 7
 8
 9
10
11
12
|
<dependency>
	<groupId>javax.servlet</groupId>
	<artifactId>servlet-api</artifactId>
	<version>2.4</version>
	<scope>provided</scope>
</dependency>
<dependency>
	<groupId>javax.servlet.jsp</groupId>
	<artifactId>jsp-api</artifactId>
	<version>2.0</version>
	<scope>provided</scope>
</dependency>
|
src/main/java 下载创建名为 TestServlet 的jave类
 1
 2
 3
 4
 5
 6
 7
 8
 9
10
11
12
13
14
15
16
17
18
19
20
21
22
23
24
25
|
package com.example.simpledb;

import java.io.IOException;
import javax.servlet.ServletException;
import javax.servlet.http.HttpServlet;
import javax.servlet.http.HttpServletRequest;
import javax.servlet.http.HttpServletResponse;

public class TestServlet  extends HttpServlet
{
  private static final long serialVersionUID = 1L;
  protected void doPost(HttpServletRequest req,HttpServletResponse res)
                 throws ServletException, IOException
  {
    String hello="Test : Hello April!";
    System.out.print(hello);
    res.getWriter().write(hello);
  }

  protected void doGet(HttpServletRequest req,HttpServletResponse res)
                 throws ServletException, IOException
  {
    doPost(req, res);
  }
}
|
src/main/webapp/WEB-INF/web.xml
 1
 2
 3
 4
 5
 6
 7
 8
 9
10
11
12
13
14
15
16
17
|
<web-app>
  <display-name>simpledb</display-name>
  <servlet>
    <servlet-name>test</servlet-name>
    <servlet-class>com.example.TestServlet</servlet-class>
  </servlet>
  <servlet-mapping>
    <servlet-name>test</servlet-name>
    <url-pattern>/test</url-pattern>
  </servlet-mapping>
  <welcome-file-list>
    <welcome-file>index.html</welcome-file>
    <welcome-file>index.htm</welcome-file>
    <welcome-file>index.shtml</welcome-file>
    <welcome-file>index.jsp</welcome-file>
  </welcome-file-list>
</web-app>
|
浏览器访问 http://127.0.0.1:8080/simpledb/test
直接在 Tomcat 下部署并调试
进入 conf\Catalina\localhost 目录,添加simpledb.xml文件
1
|
<Context path="/simpledb" docBase="D:\code\java\simpledb\src\main\webapp" debug="0" reloadable="true" privileged="true"/>
|
现在可以点击 来运行和调试maven的web工程了
注:如果遇到 Fatal error compiling: tools.jar not found: C:\Program Files\Java\jre7..\lib\tools.jar 错误,注意 JAVA_HOME 要设置为 JDK_HOME,或者在eclipse里
Step 1 : Right Click on Eclipse project Properties
Step 2 : Java Build Path >Libraries
Step 3 : Click on JRE > Edit > Installed JRE
Step 4 : Edit Jre > Set JRE Home = JDK_HOME